Build a customized development environment |
Java Development Kit(JDK) includes the Java Runtime Environment (JRE). The JDK version supported by this customized development project in iPortal is 1.8 and above. As for Java Integrated Development Environment(IDE), the most popular tool is Eclipse.
You need to configure environment variables after installing JDK, click Computer→Properties→Advanced System Settings→Advanced→Environment Variables→System Variables→New JAVA_HOME Variable, and fill the variable value with the JDK installation directory.
Note:
For SuperMap iPortal license configuration, please refer to License Configuration.
SuperMap iPortal 8C SP1 or newer version does not rely on SuperMap Objects Java anymore, but running license relies on the dynamic library file HASPJava.dll (64-bit HASPJava_x64.dll).
You can configure the following environment variables to use the dynamic library that comes with iPortal:
%SuperMap iPortal_HOME%, the installation directory of the SuperMap iPortal product package. After the variable value of Path, enter something like: %SuperMap iPortal_HOME%\support\SuperMap_License.
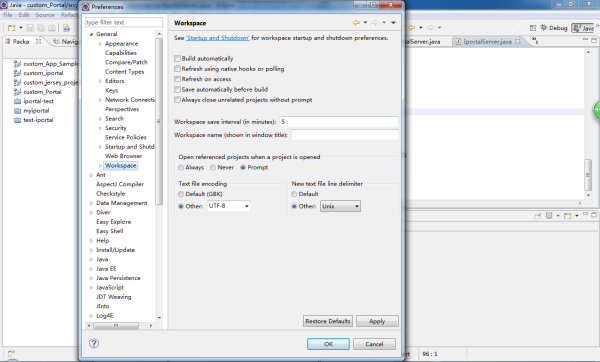
Start Eclipse, click Window> Preferences, then select General in the left menu of the window corresponding to Preferences. Select Workspace in the expanded items, and then check Other under Text file encoding in the right menu, and select UTF-8. Similarly, Check Other under New text file line delimiter, select Unix, as shown in the figure below, and click OK.
Next, we will take the Custom_Portal custom project in the %SuperMap iPortal_HOME%\samples\code\CustomPortal directory as an example to introduce the configuration steps of the project in detail.
Step 1: Copy the %SuperMap iPortal_HOME%\samples\code\Custom_Portal directory to the working directory of Eclipse, such as D:\SuperMap\eclipse-workspace.
Step 2: Copy all the folders under the %SuperMap iPortal_HOME%\webapps\iportal directory (excluding the lib folder and the cache folder under the %SuperMap iPortal_HOME%\webapps\iportal\WEB-INF directory) to D:\ SuperMap\eclipse-workspace\Custom_Portal\WebContent directory, and merge with existing folders.
Step 3: Modify the D:\SuperMap\eclipse-workspace\Custom_Portal\WebContent\WEB-INF\web.xml file, delete the filter definition of httpHeaderSecurity, CorsFilter, and the definition of corresponding filter-mapping, that is, delete the following bold code section:
...
<display-name>SuperMap iPortal</display-name>
<filter>
<filter-name>CorsFilter</filter-name>
<filter-class>org.apache.catalina.filters.CorsFilter</filter-class>
<async-supported>true</async-supported>
<init-param>
<param-name>cors.allowed.origins</param-name>
<param-value>*</param-value>
</init-param>
<init-param>
<param-name>cors.allowed.methods</param-name>
<param-value>GET,POST,HEAD,OPTIONS,PUT,DELETE</param-value>
</init-param>
<init-param>
<param-name>cors.allowed.headers</param-name>
<param-value>Content-Type,X-Requested-With,accept,Origin,Access-Control-Request-Method,Access-Control-Request-Headers</param-value>
</init-param>
<init-param>
<param-name>cors.exposed.headers</param-name>
<param-value>Access-Control-Allow-Origin,Access-Control-Allow-Credentials</param-value>
</init-param>
<init-param>
<param-name>cors.support.credentials</param-name>
<param-value>false</param-value>
</init-param>
</filter>
<filter>
<filter-name>iserver-services</filter-name>
<filter-class>com.supermap.server.host.webapp.ApplicationFilter</filter-class>
<async-supported>true</async-supported>
</filter>
<filter>
<filter-name>hostHeaderAttackFilter</filter-name>
<filter-class>com.supermap.server.host.webapp.filters.HostHeaderAttackFilter</filter-class>
<init-param>
<param-name>allowedHosts</param-name>
<param-value></param-value>
</init-param>
</filter>
<filter>
<filter-name>httpHeaderSecurity</filter-name>
<filter-class>org.apache.catalina.filters.HttpHeaderSecurityFilter</filter-class>
<init-param>
<param-name>antiClickJackingEnabled</param-name>
<param-value>false</param-value>
</init-param>
<init-param>
<param-name>antiClickJackingOption</param-name>
<param-value>SAMEORIGIN</param-value>
</init-param>
<init-param>
<param-name>blockContentTypeSniffingEnabled</param-name>
<param-value>false</param-value>
</init-param>
<async-supported>true</async-supported>
</filter>
...
<filter-mapping>
<filter-name>hostHeaderAttackFilter</filter-name>
<url-pattern>/*</url-pattern>
</filter-mapping>
<filter-mapping>
<filter-name>httpHeaderSecurity</filter-name>
<url-pattern>/*</url-pattern>
</filter-mapping>
<filter-mapping>
<filter-name>CorsFilter</filter-name>
<url-pattern>/*</url-pattern>
</filter-mapping>
<filter-mapping>
<filter-name>iserver-services</filter-name>
<url-pattern>/*</url-pattern>
</filter-mapping>
<filter-mapping>
<filter-name>UrlRewriteFilter</filter-name>
<url-pattern>/*</url-pattern>
<dispatcher>REQUEST</dispatcher>
<dispatcher>FORWARD</dispatcher>
</filter-mapping>
...
Step 4: Create a new lib folder in the D:\SuperMap\eclipse-workspace\Custom_Portal\WebContent\WEB-INF directory, and copy the following jar packages in the %SuperMap iPortal_HOME%\webapps\iportal\WEB-INF\lib directory to D:\SuperMap\eclipse-workspace\Custom_Portal\WebContent\WEB-INF\lib directory:
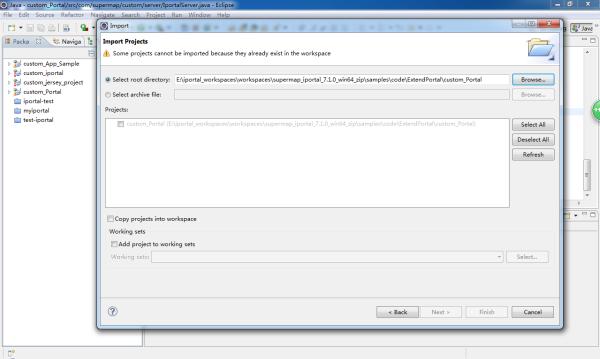
Step 5: Import a custom development project in Eclipse. Open the File menu of Eclipse, then click Import, select General in the Import tab. Click Existing Projects into Workspace in the expanded items, and then click Next, and find the Custom Portal project under the D:\SuperMap\eclipse-workspace directory, as shown in the figure below, click Finish to complete project importing.
Step 6: Right-click the Custom_Portal project in Eclipse, select Build Path> Configure Build Path, and then click the Libraries tab in the pop-up dialog box, drag the scroll bar below to select JRE System Library, next click the Edit button on the right to select the JDK 1.8 version configured on your machine, which shown in the following figure:
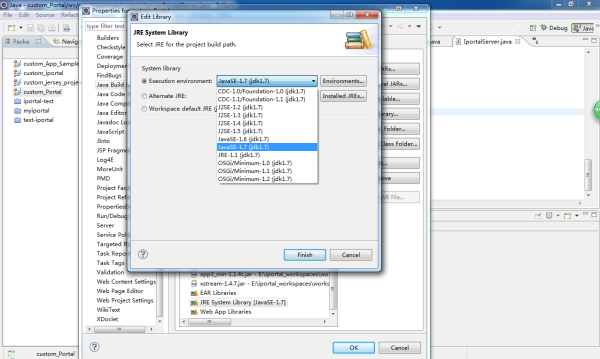
Then, click Finish.
Step 7: Configure the dependent jar package. Right-click the Custom_Portal project in Eclipse, select Build Path> Configure Build Path, click the Libraries tab in the pop-up dialog box, and then add the following jars by clicking the Add External JARs button:

Then, click OK.
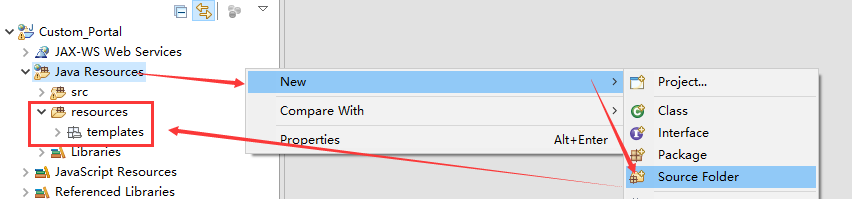
Step 8: Create a "resources" directory at the same level as "src" in the Eclipse project. Meanwhile, create a subdirectory "templates" under the "resources" directory:
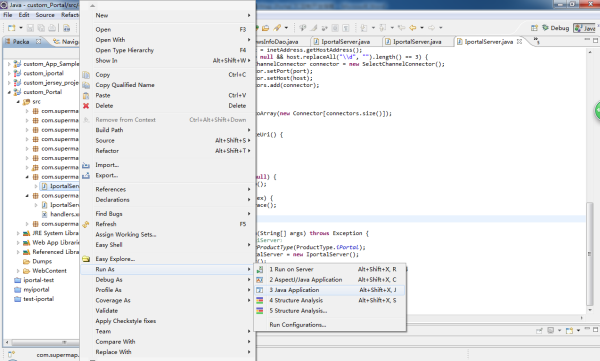
Step 9: Right-click the ImportalServer.java class under the Custom_Portal project (located in the src> com.supermap.iportal.web.custom.server package), and then select Run as> Java Application. After starting the service successfully, you can use localhost:8091/iportal to access.
After completing the project configuration, the required files will be generated in the D:\SuperMap\eclipse-workspace\Custom_Portal\WebContent\WEB-INF directory, as shown in the following figure:
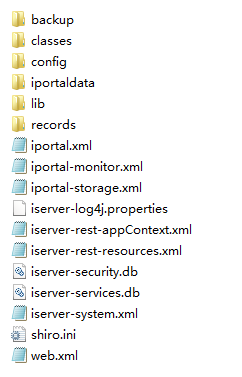
classes folder: store static resources, templates, and other information used for deployment of iPortal.
config folder: store all international resource configuration files of iPortal
iportaldata folder: store database files of iPortal
lib folder: store the jar files that iPortal depends on
records folder: store database files